How to Design a Compact Indoor Herb Garden for Small Kitchens
Problem
Small kitchens often lack the room for a full-size planter or the luxury of a sunny balcony. Yet fresh herbs are compact, flavorful, and cut food waste when grown at home. The challenge is translating limited horizontal space and variable light into a reliable system that keeps herbs healthy without constant attention. Too little light, poor drainage, or oversized pots can quickly lead to leggy, stressed plants—or a drawerful of soggy soil.
Principles
Designing a compact indoor herb garden is best approached by a set of clear, practical principles. Each principle answers a common failure mode and points to simple adjustments.
1. Prioritize the right light
Most culinary herbs need bright, indirect light. Positioning matters more than perfect sun hours. South- or west-facing windows are ideal; east-facing windows work if afternoon shadows are minimal. If natural light is limited, favor herbs tolerant of lower light (e.g., chives, mint, parsley) and consider a small LED grow light for 2–4 hours in the morning or evening.
2. Use containers sized to plant needs
Small pots save space but must match root volume. Herbs with shallow roots—basil, chives, parsley—do well in 8–12 cm (3–5 in) pots. Perennial herbs or larger-rooted types like rosemary benefit from 15–20 cm (6–8 in) containers. Always use containers with drainage holes and, for saucers, avoid leaving water pooled under pots.
3. Choose a fast-draining soil mix
A soilless mix blended for herbs or vegetables gives good drainage and aeration. A simple homemade blend is two parts peat-free compost or coco coir, one part perlite, and one part fine bark or composted wood. This reduces compaction and helps prevent root rot in small containers.
4. Water deliberately
Small containers dry out faster. Check soil moisture with your finger—water when the top 2 cm (about 1 in) feels dry. Use a small watering can or syringe for accuracy. Water until it flows from the drainage hole, then allow the mix to dry slightly before the next watering.
5. Match plants to microclimates
Identify warm spots (above the fridge), cooler corners, and drafty windows. Group herbs with similar needs—basil and cilantro like warmer, brighter locations; mint tolerates lower light and higher moisture. This reduces stress and simplifies care.
6. Keep plants productive with pruning
Regular trimming encourages bushy growth. Pinch back basil before it flowers to keep leaves tender. Harvest chives from the base, and remove flower stalks from parsley and cilantro to prolong leaf production.
Examples
Three compact setups show how to apply these principles in real kitchen scenarios.
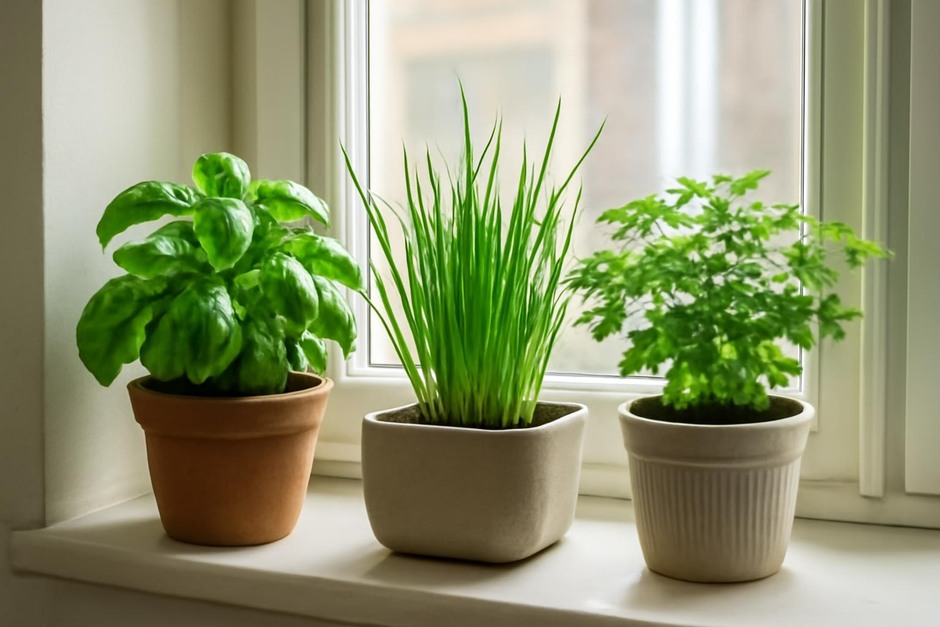
1. Classic windowsill trio
- Space: 60–80 cm of windowsill.
- Plants: basil (one 12 cm pot), parsley (one 10 cm pot), chives (one 8 cm pot).
- Setup notes: Use saucers to catch excess water; rotate pots weekly so growth is even; trim basil weekly to prevent flowering.
2. Vertical pocket or hanging planters
- Space: narrow wall space or over-the-sink area.
- Plants: mint and thyme in shallow pockets; oregano or chives in slightly deeper ones.
- Setup notes: Choose pockets with liner and drainage; water from the top and allow excess to drip into a tray you empty regularly; avoid heavy pots to protect the wall.
3. Modular tray for appliance tops
- Space: top of the fridge or a narrow shelf above the counter.
- Plants: rosemary in a larger pot, cilantro in a medium pot, baby kale or microgreens in a shallow tray.
- Setup notes: Use a tray to group pots, which simplifies moving them to brighter spots; place a small clip-on LED if natural light is weak; ensure ventilation so leaves don’t stay wet after watering.
Concise Practice Checklist
- Assess light: observe window exposure for three days; pick plants that match.
- Pick containers: match pot size to plant root depth; ensure drainage.
- Mix soil: use a fast-draining blend (e.g., compost or coco coir + perlite).
- Plant placement: group similar needs together (warm/bright vs. cool/moist).
- Water routine: check top 2 cm; water until drainage, then let dry slightly.
- Trim weekly: pinch tips to promote bushiness and prevent flowering.
- Light boost if needed: add 2–4 hours of LED light for dim spots.
- Rotate monthly: turn pots for even growth and inspect for pests or mold.
With attention to these principles and a simple setup that fits your kitchen, a compact indoor herb garden is an achievable, low-waste way to keep fresh flavor on hand. Start with one small corner and iterate—small, well-sited plants are often more successful than an overloaded shelf.